Upgrading to Debian 12 from whole disk Ubuntu + LUKS
Debian 12 is out and its awesome. My personal highlights on a 2017 era Thinkpad:
- Bundled firmware blobs
- Working out-of-the-box WIFI
- “Easy” NVIDIA driver setup
- Secure boot support
- 100% free (as in freedom) software… apart from those nasty blobs above
- Sound, bluetooth, webcam - 100% working
- No SNAPs
If you your laptop already has Ubuntu or some other Linux installed and using basically the whole disk with a LUKS partition, your SOL for upgrading using the regular debian installer.
By far the simplest thing to do in this case is to backup the entire disk, wipe it and do a fresh install, then restore selected directories from backup, in which case you do not need to read on.
Debian 12 in-place LUKS upgrade
Preserving data and installing Debian 12 is possible but its a manual process using debootstrap. This guide was assembled from a long weekend spent reading stack overflow posts and experimenting.
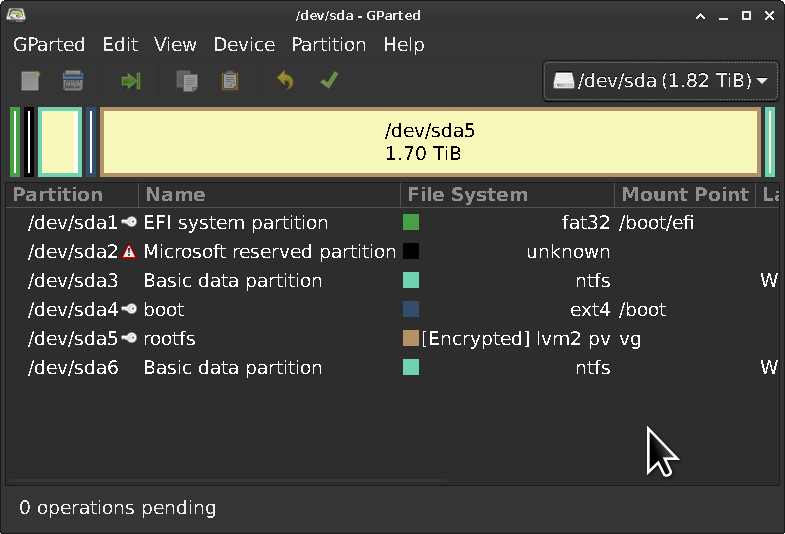
This is the disk being upgraded:

/dev/sda1- EFI/dev/sda2- Something to do with Windows/dev/sda3- Windows 10/dev/sda4-/boot(EXT4)/dev/sda5- LUKS (Encrypted) LVM2/dev/sda6- Something to do with Windows
Preparation
Warning
- Take a backup before proceeding
- Make a note of the LUKS filesystem name from
/etc/crypttab- Make a note of the WIFI password somewhere if needed
- Download Debian 12 Live USB and burn a USB
- If wanting to dual boot Windows, create a Windows install media USB
Disk
You will need a filesystem to install Debian 12 into. If you already have a small LV filesystem for the OS in you can wipe and install into this one.
If instead the disk is currently one large LUKS partition with a single LV for OS + data its best to shrink the filesystem until there is enough space to create a seperate LV for Debian to use. If your going to use a swapfile instead of a swap partition dont forget to leave space for the swapfile.
150G Debian root filesystem leaves plenty of space for the OS, swapfile and accumulation of Docker images/crud under /var.
Heres a post on how to do shrink an EXT4 LV inside a LUKS
UEFI (BIOS)
- Enable Secure Boot if you want to use it
Installation environment
Boot from the Debian 12 Live USB, connect to Internet, open a terminal:
sudo -s

# required for grub
modprobe efivarfs

# MUST match /etc/crypttab from existing system as noted earlier (for grub)
cryptsetup luksOpen /dev/sda5 rootfs

# Everything will be installed to /target
export ROOTFS=/target
mkdir $ROOTFS
Installation
Note Other LVs in the VG will not be modified
Format and mount filesystems for OS install
Goal here is to build a cohesive filesystem at /target as if we had booted into the OS. debootstrap then installs into /target as if it were a regular Debian install.
# adjust as needed /dev/vg/root is lv="root" inside vg="vg" and is a small
# ~150GB filesystem for the OS.  Format + mount
mkfs.ext4 /dev/vg/root
mount /dev/vg/root $ROOTFS
mkdir $ROOTFS/boot

# /dev/sda5 is a small unecrypted boot partition - format + mount
mkfs.ext4 /dev/sda5
mount /dev/sda5 $ROOTFS/boot

# mount EFI partition from existing install.

# For fun, you might want to also erase your EFI partion before mounting it
# here. Theres no particular reason to do this other than curiosity and doing
# so will DESTROY YOUR WINDOWS BOOTLOADER. If you still want wipe EFI,
# instructions are here: https://wiki.archlinux.org/title/EFI_system_partition
mkdir -p ${ROOTFS}/boot/efi
mount /dev/sda1 ${ROOTFS}/boot/efi
Install the Base System
apt update
apt install debootstrap
debootstrap --arch amd64 bookworm ${ROOTFS} http://deb.debian.org/debian
Prepare chroot
# mount partitions for chroot
mount --bind /dev ${ROOTFS}/dev
mount -t devpts /dev/pts ${ROOTFS}/dev/pts
mount -t proc proc ${ROOTFS}/proc
mount -t sysfs sysfs ${ROOTFS}/sys
mount -t tmpfs tmpfs ${ROOTFS}/tmp
mount --bind /sys/firmware/efi/efivars $ROOTFS/sys/firmware/efi/efivars
Chroot into Debian installation, configure the OS and install packages (adjust as needed)
chroot ${ROOTFS} /bin/bash

#
# Its necessary to configure apt - debootstrap doesnt do this for us
#

# https://wiki.debian.org/SourcesList
cat <<EOF > /etc/apt/sources.list
deb http://deb.debian.org/debian bookworm main non-free-firmware
deb-src http://deb.debian.org/debian bookworm main non-free-firmware

deb http://deb.debian.org/debian-security/ bookworm-security main non-free-firmware
deb-src http://deb.debian.org/debian-security/ bookworm-security main non-free-firmware

deb http://deb.debian.org/debian bookworm-updates main non-free-firmware
deb-src http://deb.debian.org/debian bookworm-updates main non-free-firmware
EOF

apt update
apt install -y linux-image-amd64 linux-headers-amd64 grub-efi firmware-linux locales vim efivar cryptsetup-initramfs lvm2

# dont forget to install all the firmwares - most importantly the wifi driver...
apt install -y firmware-iwlwifi firmware-misc-nonfree firmware-linux-nonfree firmware-linux firmware-linux-free

# configure en_US locale plus your local locale to stop annoying messages
dpkg-reconfigure locales

# this little TUI lets you pick install desktop, etc...
tasksel

# set a password for root...
passwd

# add a non-root user...
adduser geoff

cat <<EOF > /etc/fstab
# /etc/fstab: static file system information.
#
# Use 'blkid' to print the universally unique identifier for a
# device; this may be used with UUID= as a more robust way to name devices
# that works even if disks are added and removed. See fstab(5).
#
# systemd generates mount units based on this file, see systemd.mount(5).
# Please run 'systemctl daemon-reload' after making changes here.
#
# <file system> <mount point>   <type>  <options>       <dump>  <pass>
/dev/vg/root       /       ext4    errors=remount-ro       0 1

# /dev/sda5
UUID=deadbeef-dead-beef-dead-beefdeadbeef /boot ext4 defaults 0 2

# /dev/sda1
UUID=dead-beef /boot/efi vfat defaults 0 2
EOF

dpkg-reconfigure tzdata

# https://gist.github.com/varqox/42e213b6b2dde2b636ef#edit-fstab-file
echo myfullysicklaptop > /etc/hostname
cat > /etc/hosts << HEREDOC
127.0.0.1 localhost
127.0.1.1 $(cat /etc/hostname)

# The following lines are desirable for IPv6 capable hosts
::1     localhost ip6-localhost ip6-loopback
ff02::1 ip6-allnodes
ff02::2 ip6-allrouters
HEREDOC
Mount aditional filesystems
Now is a good time to create mountpoints and /etc/fstab entries for other filesystems to add, eg mounting a separate LV for /home. Recommend starting with a fresh home directory and copying in the files that matter most since so much effort has been gone to for a fresh OS.
Setup grub
The basic OS is now installed. Setup grub, then reboot system.
You should now be able to login to terminal or whatever desktop was installed.
…Enjoy